Execution
Animation Nodes takes your nodetree and converts it into a script, which it then executes based on the execution options that we will present below. You may notice that when you start using Animation Nodes, a number starts to change very rapidly at the top left corner of the node editor, that number is the time it took to execute the nodetree. By default, Animation Nodes executes the nodetree as much as possible for the best and smoothest update of the scene. However, this exhausts the CPU and slows down other areas in Blender. It doesn’t make sense to execute the nodetree even if nothing changes in your nodetree or the scene, so executing the nodetree that much may not be needed. Animation Nodes provides an automatic and a manual execution system that suits your needs. Execution system options are listed in the following sections.
Automatic Execution
By default auto execution is enabled and can be found in the Auto Execution panel in the tool menu. Auto execution is controlled by a set of options that we list below.
Always
Always option does what we stated before, that is, execute the nodetree as much as possible. This option should not be used unless absolutely needed.
Notice how Animation Nodes executes the nodetree constantly and regularly even if nothing is changing, that is, the inputs and outputs are always the same. (We realize that Animation Nodes is executing upon seeing a change in the execution time, thats because the execution time is nearly never the same due to many factors, even if the nodetree didn’t change)
If always is disabled, then you get to control the execution through the options described below.
Scene Changed
If enabled, the node tree will execute every time anything in the scene changes. This is the default and should be used when the node tree depends on the data in the scene, if not, then one of the following options should be used instead.
Tree Changed
If enabled, the nodetree will execute every time the nodetree changes, that is, a node is added or removed. It is probable that you need to execute the nodetree every time you change something in your tree, so this options should be enabled accordingly.
Notice how the tree executes whenever I add a new node.
Frame Changed
If enabled, the nodetree will execute every time the current frame of the scene changes. If your nodetree depends on the current frame, then this option should be enabled.
Notice how the tree executes whenever the current frame changes.
Property Changed
If enabled, the nodetree will execute every time a property changes, that is, an input or an option of any of the nodes is changed. It is probable that you need to execute the nodetree every time you change something in your tree. Notice, however, that changing a value in the Advanced Node Settings won’t necessarily execute the nodetree even if this option is enabled.
Notice how the tree executes when I change a value in the nodetree.
Minimum Time Difference
This value defines the time between each two consecutive executions. So if the value is set to one second, the nodetree will not execute unless a second passes by, even if one of the conditions above were satisfied, that is, a frame or property changed.
Triggers
A Trigger is basically a “watcher” that you instruct to watch for a change in some property you told it to watch. It, in turn, instructs Animation Nodes to execute the node tree whenever the property it is watching changes. For instance, lets say I am using the location of an object in my node tree and I want to execute the node tree whenever the location changes, in that case, I simply add a trigger and instruct it to watch for the location of the object.
There are two options to define the property:
- Object Property - An object is chosen and the property ID is
defined relative to it. An example for such IDs are:
location,euler_rotation,location.x… . - Scene Property - A scene is chosen and the property ID is
defined relative to it. If the scene
Sceneis chosen and the ID isworld.horizon_color, then the full path of the property isbpy.data.scenes["Scene"].world.horizon_color.
Errors
During the execution of the nodetree, some errors may be encountered, those errors can either be fatal or not.
Non-Fatal Error
Non-Fatal errors are reported per node. And they do not stop execution, an example:
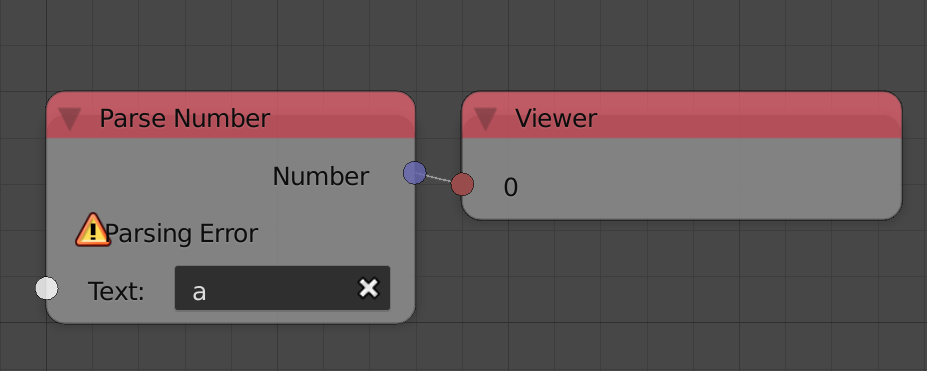
The Parse Number Node can’t parse the letter a, it can only parse
numbers, so it returns an error saying that it can’t parse this input.
Instead of stopping execution, it returns a fall-back value instead,
in this case, the default value of the number output, which is zero.
Fatal Errors
Fatal errors stop the execution of the whole nodetree and have to be solved. Such errors occur when you try to do something that the developer didn’t consider. Sometimes fatal errors persists even if you resolve them, in that case, pressing the Retry button in the Execution panel should get everything back to normal. Other times, fatal errors will persists even if Retry is pressed, this is a known bug, the only way to get the nodetree back to normal is to relaod the file. Note that a fatal error could be a bug and should be reported. An example for such error can be seen in the expression node:
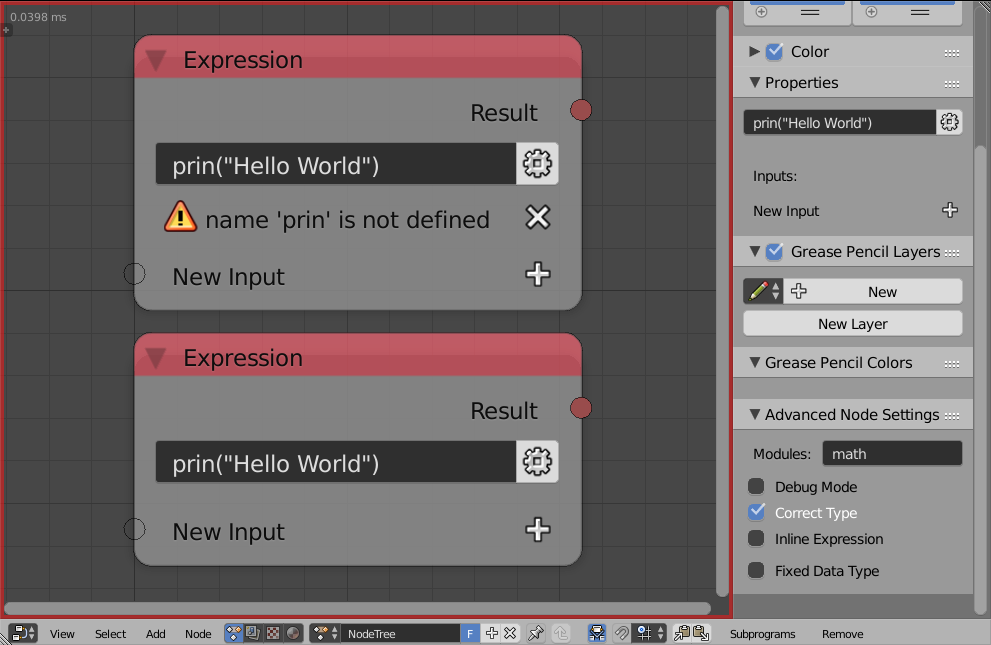
The expression node has an option to Debug the expressions you write before executing them, that is, identify if the expression is a valid python code. I disabled the option for the second one and intentionally made a syntax error. The first node reported the error as a non-fatal error and didn’t stop the execution, the second node, however, stopped the execution and colored the node editor’s borders red to indicate a fatal error. To fix that error you just solve the syntax error or enable debug option. Press Retry if that didn’t resolve it.